Showing posts with label chocolate. Show all posts

Thursday, 4 July 2013

Chocolate and Coconut Soda Bread

The last month or so has been pretty busy with this and that and with my cold that I can't seem to shift, I woke up this morning craving something a little sweet, I wasn't in the mood to make a cake, or muffins, so I started to look at making some cookies but I just couldn't decide so then it came to me...a sweet bread :))! I decided on a sweet soda bread, I hadn't tried it before and wasn't even sure it would work but the thought of chocolate and coconut was calling me so off to the kitchen I went and just threw all the ingredients in together and luckily the outcome was wonderful....exactly what I needed and my goodness was it tasty, I even managed to eat half of it before even had time to cool down and trust me the other half tasted just as good once it had cooled down haha...oops :/ 

So here it is, my recipe for Chocolate and Coconut Soda bread. This is like your normal soda bread, obviously because it is sweet but also the fact that it is a little softer once baked, also I used milk chocolate as that is all I had in my cupboards but feel free to use dark chocolate as I am sure that would work fantastic as well especially with the coconut.

Chocolate and Coconut Soda Bread

240g self raising flour
50g dessicated coconut
50g plain whole meal flour
1/2 tsp bicarbonate of soda
Pinch of salt
2 tbsp honey
80g chocolate chunks
250ml coconut buttermilk (250ml coconut milk with 1tbsp lemon juice added and set aside for 20 minutes)

Pre heat the oven to 200/190c fan

Add the flours, dessicated coconut, honey, salt, bicarb of soda and chocolate chunks into a bowl.

Add the coconut buttermilk to the dry ingredients and mix (you may need some more flour if it appears too sticky and wet, depending on your flour so add more self raising flour if needed)

Mix to form a dough and turn out into a lightly floured worktop and knead gently. Form into a round ball and pop onto a lined baking tray and score a cross on the top

Pop into the oven for 30-40 minutes until golden in colour and cooked inside... And enjoy :))


Sunday, 23 June 2013

Chocolate Chip and Orange Zebra Cake

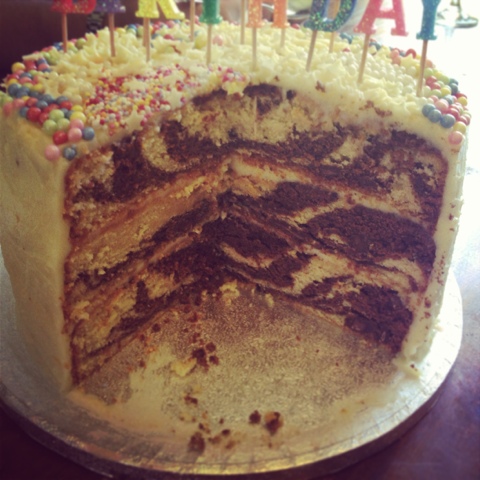
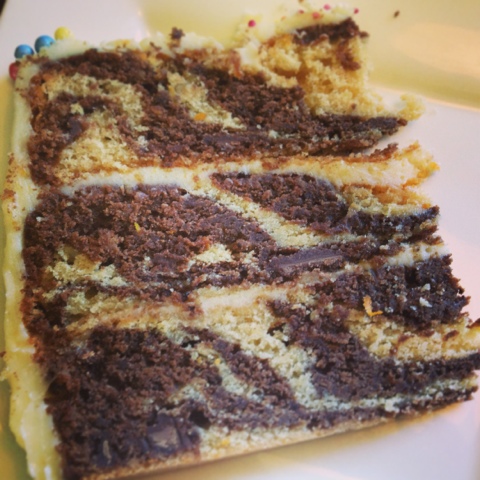
It was my hubby's birthday and I wanted to make him a special cake, but this is a man that doesn't really appreciate baking in any form really...well he says he doesn't but normally when he has a bit of cake he enjoys it hahaha! So I decided that I would make a cake regardless of him and let everyone else enjoy it hehehehe :)) I really wanted to try something different and had seen this new idea of a zebra cake but I didn't want just plain chocolate and plain sponge and certainly not a pink version :))! So I came up with Chocolate Chip and Orange Zebra Cake and must I just say wow wow wee, it was fantastic!!!!
I came up with a new sponge and added the orange flavour as well some cocoa powder to half the batch and some good chocolate chunks (not chips, there are far too small) and it produced the most heavenly cake which received the comments "it's the best cake I've ever tasted!" And "it's like eating a Terry's chocolate orange...but in cake form!" I'm happy with those comments and for such a large cake, there wasn't much left hehe :) 
As mentioned this is quite a large cake but is a really fantastic celebration cake...so here's the recipe and I really hope you enjoy it :)

Chocolate Chip and Orange Zebra Cake

450g butter softened
300g caster sugar
150g soft brown sugar
450g self raising flour
70g ground almonds
2 tsp baking powder
6 eggs
300ml natural yoghurt
2 tsp vanilla extract
Zest of 2 oranges
7 tbsp cocoa powder
100g chocolate chunks 


Butter and flour 3 x 20cm (8") cake tins
Pre heat the oven to 180/170c fan

In a large bowl add the softened butter and sugars and mix well.
Add the flour, ground almonds and baking powder and mix until incorporated. 
Add the eggs and mix them in, once incorporated add the yoghurt and vanilla extract and mix to form a nice smooth batter. Add the zest of the two oranges and mix in.

Pour half the mixture into another bowl and add the cocoa powder and stir this in until the cocoa powder has disappeared completely into the batter, then add the chocolate chips and stir in.

Line the three tins in a row and get the two batters ready

Get large serving spoons ready (2...1 for the plain orange batter and 1 for the chocolate orange batter) 

Starting with the plain orange batter, spoon (1 spoonful) some into the middle of the first tin, then repeat with the other two tins

Then spoon the chocolate orange batter on top of the plain orange batter and do in all tins

Repeat with the plain orange batter and spoon some on the chocolate batter, then the plain and then the chocolate...keep spooning each layer of flavour into the next. If you do the three tins at the same time, you should end up with the same amount of batter in each tin and the layers will be equal - if you struggle with this, feel free to just do a marble effect!

Pop into the pre heated oven for around 30 minutes (could be up to 40 minutes depending if the layers are equal)

Remove once a skewer inserted comes out clean

Allow to cool and remove from the tins 

Orange Cream Cheese Frosting

140g butter softened
200g cream cheese
200g mascarpone
200g icing sugar
Zest of 1 orange

In a bowl mix the butter until lovely and soft 

Add the cream cheese, mascarpone and orange zest and mix with the butter until smooth (do not over mix as it will become runnier the more you mix)

Sift the icing sugar and mix until fully Incorporated (but remember...don't over mix)

Place one of the layers on a plate, cake stand or cake board

Spoon some of the cream cheese frosting on the top and with a palette knife smooth around the top of the cake

Place another layer on top of the bottom layer and again spoon some of the cream cheese frosting and smooth on

Place the final layer on top 

Now it's time to cover the cake, as the cake is darker underneath, it's worth getting a thin layer round the edge (crumb layer) and pop in the fridge to set to then finish off with another layer of frosting. The top is normally okay so cover the top with a good layer to begin with.

If you are preparing this a day before, pop the finished cake in the fridge and remove a couple of hours before serving so as to bring to room temperature.

And now it's time to enjoy :))


Wednesday, 5 June 2013

Double Chocolate and Avocado Muffins

After a mexican filled weekend, I ended up with a few avocados leftover and really wanted to use them up but with a different kind of recipe. I had recently seen a recipe for avocado brownies but I didn't want something so rich and decided that the best option was a muffin...no one can resist a good muffin! I took to the kitchen, with son in toe and went into recipe developing mode and came up with this recipe...and all I can say is wow :)) These muffins have just the right amount of chocolate, they are unbelievably moist and so flavoursome, but don't worry you won't be able to taste the avocado but at least you know that you are consuming something a little healthy in a chocolate muffin...who would have thought haha...and perfect for kids, great way of getting some goodness into them without their knowing wahaaaaaa :))

Double Chocolate and Avocado Muffins

270g self raising flour
30g cocoa powder
1/2 tsp baking powder
1/2 tsp salt
100g soft brown sugar
50g caster sugar
2 eggs 
125ml buttermilk
75ml vegetable oil
2 ripe avocados
100g Chocolate chips

Pre heat the oven to 180/170c fan and pop muffin cases into a muffin tray

In a bowl add all the dry ingredients and mix well

In a jug add the buttermilk, oil and eggs and whisk until frothy

Cut the avocado and scoop out the inside into a bowl and mash up 

Add the buttermilk mixture, the mashed up avocado and the chocolate chips to the dry ingredients and fold in gently (not more than 10 times) 

Spoon into the prepared muffin cases, almost to the top (I managed to get 11) and pop into the pre heated oven for around 25 minutes or until a skewer comes out clean

And enjoy :)

Wednesday, 17 April 2013

Choux Buns...Profiteroles

One of my husbands favourite desserts aside from pavlova is profiteroles (and eclairs) so at the weekend I decided to knock up a batch. Don't be put off from making Choux Buns, they are a lot easier than you think, honest and there are so many possibilities...I made profiteroles this time, but you can do eclairs, cream puffs, beignets souffles and even savoury choux buns...so here's the recipe :)

Profiteroles

Choux Buns
60g plain flour
1 tsp caster sugar
150ml water
50g butter
2 eggs

Filling
450ml Double cream
Zest of 1 large orange

150g chocolate to cover

Pre heat the oven to 200/180c

Measure out the plain flour and caster sugar

Grease a baking tray and run under cold water for a few seconds and allow the excess water to run off

Heat the water and butter in a pan until it starts to boil, straight away pour in the flour/sugar mixture and mix until it becomes smooth and starts to come away from the sides of the pan

Beat the two eggs together and slowly mix the eggs in, a small bit at a time

Spoon teaspoon amounts into the greased baking tray and place in the oven for 10 minutes at 200/180c then turn up to 225/200c for a further 15 to 20 minutes until they are crisp and golden in colour

Pierce the bottom of the Choux buns with a small skewer and place on a cooling rack

Put your cream into a bowl and add the orange zest and mix in. with a hand mixer, beat to stiff peaks

Place in a piping bag fitted with a small nozzle and pipe the cream into the cooled down Choux buns

When ready to serve, pour over the melted chocolate and serve with a little cream :))


Thursday, 4 April 2013

Chocolate Chip Cookie Dough Dip

I'm the queen of parties, I like to have a party for every occasion, Christmas, Halloween, birthdays, summer, Easter...pretty much anytime really haha and it also gives me an excuse to bake and make some fun and exciting goodies for guests! This time round was my sons Easter party so lots of 3 year olds to cater for and of course the parents!
My cookies are famous amongst my friends and I keep re inventing them with new flavours but I wanted something fun for the party and it came to me...well while looking through the Internet for ideas....Chocolate Chip Cookie Dough Dip...it couldn't be more perfect and served with Easter shape cookies.
The only thing I noticed that I wasn't keen on was most of them were just cream cheese with sugar and some chocolate chips which is really not like cookie dough at all, so I came up with my own and wow was it a hit, it is like eating the cookie dough before you put it in the oven but without the egg...perfect! You can thank me later :))

Chocolate Chip Cookie Dough Dip

2/3 cup butter softened
1/2 cup soft brown sugar
1/2 cup granulated sugar
1 tsp vanilla extract
1/4 mascarpone
1 3/4 cup plain flour
1/2 tsp bicarbonate of soda
1/2 tsp salt
1 cup chocolate chips

Add the butter and sugar into a bowl and mix until light and fluffy
Add the vanilla extract and mascarpone and mix well

Add the flour, bicarb, salt and mix until the dough starts to form together then add the chocolate chips and knead in

And your away...

I personally like it exactly like cookie dough but If you want it more dip like and softer, feel free to add more mascarpone until you get the desired consistency :)


Friday, 29 March 2013

Chocolate and Orange Hot Cross Buns

It's Good Friday and a perfect time for some easter baking. Hot Cross Buns are a perfect easter treat but I'm going to be honest...I'm not a big fan of raisins and currants :( so I normally stay away from them but this year I decided to make my own but with a twist so that I could eat and enjoy them....chocolate and orange hot cross buns! They were out of this world...don't just take my word for it, definitely give them a go :)

Chocolate and Orange Hot Cross Buns

450g strong white bread flour
25g cocoa powder
7g fast action yeast
60g caster sugar
1 tsp salt
1/2 tsp cinnamon (ground)
1/2 tsp vanilla extract
40g butter
300ml milk
100g chocolate chips
Zest of one large orange

Crosses
75g flour
75ml water

Glaze
3 tbsp caster sugar
3 tbsp orange juice

Pour the milk into a pan and add the milk and heat gently until the better has melted (try not to boil the milk), add the vanilla extract and set aside. It needs to be like warm.

Place the flour, yeast, sugar, salt, orange zest and cinnamon into a bowl and slowly add the milk/butter mixture. Mix until you get a soft dough and then add the chocolate chips.

Knead for around 10 minutes or 5 minutes if using a stand mixer

Place in an oiled bowl and leave to prove for around 1 1/2 hrs or until doubled in size

Turn out onto a lightly oiled work surface and knock back. Divide into 12 balls and roll the balls gently to make them smooth and place on a lined baking sheet. Cover with lightly oiled cling film and leave to prove again, until about doubled in size (about 45 minutes)

Pre heat the oven to 200/180c

Mix the flour and water together to a smooth spreadable paste and fill a piping bag fitted with a small holed nozzle.

Pipe crosses onto the buns and place into the pre heated oven for about 15 minutes.

While the buns are baking, make up the glaze by add the caster sugar and orange juice in a pan and heat until the sugar is dissolved.

Once the hot cross buns are cooked, remove from the oven and immediately brush the orange glaze over all the buns

Enjoy :))


Wednesday, 13 March 2013

Another loaf cake :))

Well this cold weather looks like its here to stay for a while...must say I'm sick of it now and desperate for some mild and warm weather but until then I'm occupying the cold days with lots of baking. Again I made a loaf cake but this was purely because I had some ricotta left over and didn't really fancy anything savoury haha! I found a recipe and although it looked good I made many alterations to make it my own and really glad I did as the end result was divine, moist, chocolatey, and very moorish!

Chocolate, Orange and Walnut Ricotta Loaf Cake

1 ¼ cups all-purpose flour
¾ cup unsweetened Dutch cocoa powder
1 ¼ tsp baking powder
½ tsp baking soda
½ tsp salt
¼ cup milk
2 tsp pure vanilla extract
1/2 cup butter, at room temperature
1/2 cup caster sugar
1/2 soft light brown sugar
8 oz whole fat ricotta cheese, at room temperature
Zest of one large orange
3 large eggs
1/2 cup toasted walnuts
½ cup (3 oz) chocolate chips

preheat the oven to 180/170c . Butter and Line an 8×4-inch loaf pan with parchment paper.
Sift the flour, cocoa, baking powder, soda, and salt into a bowl.
In another small bowl or a cup, combine the milk and vanilla extract.
In a large bowl, beat the butter until creamy, add the sugar and beat until light and fluffy. Add the ricotta and beat well to combine. Now add the orange zest and mix in.
Add the eggs, one at a time, beating well after each addition. Now add the dry ingredients in two additions alternating with the mix mixture, try not to over mix, just fold in enough to incorporate the ingredients. Stir in the toasted walnuts and chocolate chips.
Transfer the batter into the loaf tin, smooth the top and bake for about 1 hour or until a cake tester inserted into the centre comes out clean. Cool in the pan on a rack for 10 minutes, then turn out and cool completely on a rack.


Friday, 8 March 2013

Chocolate Truffles...perfect gift for Mothers Day

As promised and just in time for Mother's Day, the recipe for chocolate truffles...easy to make and perfect as a gift.

Chocolate Truffles

300ml Double Cream
Knob of butter
300g Dark Chocolate (min 70% cocoa solids)

Coatings
Melted chocolate
Cocoa powder
Hazelnuts, pecans, pistachios, almonds
Desiccated coconut
Mixed peel

Break up the chocolate in a bowl and pour the cream into a saucepan.

Heat the cream in the pan and when it starts to boil add the knob of butter, stir and pour over the chocolate.

Allow the chocolate to melt and then allow to cool before transferring to the fridge.

Keep in the fridge for at least 2 hours for the mixture to set.

Remove from the fridge and bring to room temperature.

Using a spoon roll the mixture into balls and either roll into cocoa powder, melted chocolate, crushed nuts...whatever your heart desires :)))

Sunday, 3 March 2013

Literally the best cake you will ever eat :)

It was my best friends birthday and of course I wanted to make an extra special cake...a plain sponge with boring buttercream just wouldn't cut it so I wanted something that would produce gasps of amazement and so it had to be my Devilish Chocolate Cake with Cookie Dough Buttercream and a Brownie Waterfall....its absolutely out of this world! I have a very, very happy best friend who has described it as the best cake he's ever had...quite the compliment! Honestly give it a go, you won't regret it!

Devilish Chocolate cake

2 cups white sugar
1 3/4 cups all-purpose flour
3/4 cup unsweetened cocoa powder
1 1/2 teaspoons baking soda
1 1/2 teaspoons baking powder
1 teaspoon salt
2 eggs
1 cup milk
1/2 cup vegetable oil
2 teaspoons vanilla extract
1 cup boiling water

Preheat oven to 350 degrees F (175 degrees C). Grease and flour two 9 inch cake pans.
Use the first set of ingredients to make the cake. In a medium bowl, stir together the sugar, flour, cocoa, baking soda, baking powder and salt. Add the eggs, milk, oil and vanilla, and mix. Stir in the boiling water by hand. Pour evenly into the two prepared pans.
Bake for 30 to 35 minutes in the preheated oven, until a toothpick inserted comes out clean. Cool for 10 minutes before removing from pans to cool completely.
This recipe makes a two layer 9" cake but you can use the mixture to make a different size ie 8" or like me a two tier cake of 6" and 4" ( just adjust the cooking times)
While the cakes are cooling you can make up the brownies.

The Best Chocolate Brownies
(I halved this recipe for the cake but I've given you the full recipe as its so good)

250 g unsalted butter
200 g good-quality dark chocolate (70% cocoa solids), broken up
80 g cocoa powder, sifted
65 g plain flour, sifted
1 teaspoon baking powder
360 g caster sugar
4 large free-range eggs

Preheat your oven to 180°C/350°F/gas 4. Line a 25cm square baking tin with greaseproof paper. In a large bowl over some simmering water, melt the butter and the chocolate and mix until smooth.
In a separate bowl, mix together the cocoa powder, flour, baking powder and sugar, then add this to the chocolate, mixture. Stir together well. Beat the eggs and mix in until you have a silky consistency.
Pour your brownie mix into the baking tray, and place in the oven for around 25 minutes. You don't want to overcook them so, unlike cakes, you don't want a skewer to come out all clean. The brownies should be slightly springy on the outside but still gooey in the middle.
Leave to cool, preferably over night! You can of course add nuts to the brownies (50g)

Cookie Dough Buttercream

250g butter softened
2/3 cup light brown sugar, packed
2 1/2 cups (about 315g) icing/confectioners' sugar, sifted
2/3 cup (about 85g) all-purpose flour
1/2 tsp. salt
2 tbsp milk
2 tsp vanilla extract
200g (about 1 cup) mini chocolate chips or finely chopped pieces of milk chocolate

Prepare the buttercream; beat together the butter and brown sugar in a large mixing bowl with an electric mixer on high. Mix in the icing sugar until smooth. Beat in the flour and salt. Mix in the milk and vanilla extract until smooth and well blended. Stir in chocolate chips until evenly mixed.

Smooth some of the buttercream between the two layers and sandwich together and use the remaining buttercream to spread around the cake.
Now cut up the brownies into small squares and position them on the cake
Pour melted chocolate over the top and enjoy....enjoy...enjoy :))




Saturday, 23 February 2013

My little baking secret...The Best Chocolate Chip Cookies

I'm going to let you into a little secret...my famous Chocolate Chip Cookies. They are just so tasty and I get asked all the time to whip up a batch with all different fillings! They started off as a vegan cookie as my son wasn't able to have egg or dairy when he was a toddler so I made these and once he outgrew the allergy then I adapted it to include egg and dairy but ill include the adaptions for you.

Chocolate Chip Cookies

2/3 cup Butter or dairy free margarine

1/2 cup Soft muscavado sugar

1/2 cup granulated sugar

1 tsp. vanilla extract

1 Egg or 1/4 cup unsweetened applesauce

1 3/4 cup all purpose flour

1/2 tsp. baking soda

1/2 tsp. salt

1 cup Chocolate Chips or dairy free chocolate chips

Preheat oven to 375 degrees and line a baking sheet with parchment paper. In a bowl, combine the butter or shortening, brown sugar, granulated sugar, vanilla, then add the egg or applesauce. In a separate medium bowl combine the flour, baking soda and salt. Add to butter mixture and combine until creamy. Stir in chocolate chips and drop with a cookie scooper onto prepared baking sheet.
Bake for about 12 minutes (depending on the size) or until lightly brown. Cool slightly on baking sheet and serve!

There's lots of variations which I will add on but if like me why not add some orange zest to the dough...yummy :)


Friday, 22 February 2013

Caramel and Chocolate Layer Cake, Heavenly in every way

It was my grans 85th birthday today so of course I had to make her a super duper cake...and because I'm really rubbish at buying presents! I definitely wanted to make something memorable so I opted for a Caramel and Chocolate layer cake and i wasnt wrong about it being memorable...it was heavenly! It really was absolutely wonderful and went down a storm with the family, with everyone taking home huge chunks with them in doggy bags hahaha :)

Chocolate and caramel layer cake

Vanilla and Chocolate Sponges
225g very soft butter , plus extra for greasing
225g golden caster sugar
175g self-raising flour
85g ground almonds
1 tsp baking powder
3 eggs
150ml pot natural yogurt
1 tsp vanilla extract
5 tbsp cocoa powder

Caramel and Caramel/Chocolate Sponges
225g very soft butter , plus extra for greasing
225g light muscovado sugar
175g self-raising flour
85g ground almonds
1 tsp baking powder
3 eggs
150ml pot natural yogurt
1 tsp vanilla extract
1 tbsp cocoa

Caramel sauce
300g Granulated sugar (300g)
50g/ 3.5 tablespoons Water
240g Butter cut into small pieces
200g Double cream , warmed
Place the sugar and water in a saucepan, and cook on low heat until it turns golden brown. Do not overmix, or your sugar will crystallize.
Add the butter little by little while gently stirring with a wooden spoon. (Be careful! The mixture is very hot; it sizzles and might splatter.)
Remove the saucepan from the heat, and add the warmed cream. Mix until well combined.
Pour into jars and let cool. The spread should keep for at least three months in the refrigerator.
Keep in the refrigerator so that your confiture has a beautiful, spreadable consistency.
*Please feel free to use shop bought caramel sauce if you would like

Chocolate Buttercream
1 cup unsalted butter ( 1/2 pound), softened
3 1/2 cups confectioners (powdered) sugar
1/2 cup cocoa powder
1/2 teaspoon table salt
2 teaspoons vanilla extract or 1 teaspoon almond extract
4 tablespoons milk or heavy cream
Instructions

Heat oven to 180C/160C fan/gas 4. Grease and line 2 x 20cm sandwich tins with baking parchment.
For the Vanilla & chocolate sponges, mix all the ingredients, apart from the cocoa, together with an electric whisk. Scrape half the mix into a second bowl and mix in the cocoa. Scrape into the tins and bake for 20-25 mins until a skewer poked in comes out clean.
Repeat step 1 for the Caramel & caramel-choc sponges, again leaving cocoa out of the first mixing, then splitting the mix in half and mixing the cocoa into one batch. Cook as above.
When the sponges are cool, spread a third of the caramel over the Vanilla sponge and top with the Caramel sponge. Spread over another third of the caramel and top with the Caramel-choc sponge, then the final third of caramel and top with the Chocolate sponge (don't panic if you mix up the layers, the cake will still look great when you cut in).
For the buttercream- Cream butter for a few minutes. Sift icing sugar and cocoa into the mixing bowl and mix until the sugar and cocoa are absorbed by the butter. Add vanilla extract and milk and beat. If your frosting needs a more stiff consistency, add a little more sugar. If your frosting needs to be thinned out, add additional milk, 1 tablespoon at a time.
Spread the chocolate buttercream over the whole cake to serve. It will keep in a cool place in an airtight container for up to 3 days.
(There may will be some buttercream left over so cover and place in the fridge for up to a week.)


Sunday, 10 February 2013

Caramel, Cream, Raspberry and Chocolate Crepe Cake

What a busy weekend I've had, so much cooking and baking. We've had friends over on both Saturday and Sunday and made feasts both days. I made a Spanish feast on Saturday which I promise to share the recipes but I will save those for another day. Sunday of course had to be a roast, it's cold outside and it was well overdue. For pudding I decided that as it was almost pancake day I would try something a little different so decided on a crepe cake, now just to figure out what to fill it with...much simpler than I thought...everything hahaha :) Caramel, Cream, Raspberry and Chocolate Crepe Cake....you can thank me later :) it truly is amazing...heavenly and out of this world! Okay the pancake making is time consuming but once that's done, your laughing, I promise you won't regret it.

Caramel, Cream, Raspberry and Chocolate Crepe cake

Pancakes -
240g plain flour
4 eggs
600ml semi-skimmed milk
2 tbsp sunflower oil or vegetable, plus extra for frying
pinch salt

Dulce de leche or any other caramel sauce (you can of course make this yourself but if time is short you can buy it already made)

Cream filling
200g mascarpone
300ml double cream
2tbsp caster sugar
1 tsp vanilla extract

Tub Raspberries

Bar of milk chocolate

Put the flour and a pinch of salt into a large mixing bowl and make a well in the centre. Crack the eggs into the middle, then pour in about 50ml milk and 2 tbsp oil. Start whisking from the centre, gradually drawing the flour into the eggs, milk and oil. Once all the flour is incorporated, beat until you have a smooth, thick paste. Add a little more milk if it is too stiff to beat.
Finishing the batter: Add a good splash of milk and whisk to loosen the thick batter. While still whisking, pour in a steady stream of the remaining milk. Continue pouring and whisking until you have a batter that is the consistency of slightly thick single cream. There's no need to let it stand, this is a myth. Make up your pancakes in a frying pan and put onto a plate and leave to cool.

Cream filling
Whisk the double cream until firm and holds it shape
In a separate bowl mix the mascarpone with the caster sugar until soft and smooth
Add the mascarpone mixture to the double cream and mix well then add the 1 tbsp vanilla extract and mix.

To make the crepe cake
Place one of the pancakes onto a plate and spoon some of the cream mixture onto the pancake and smooth all over
Spoon a small amount of the dulce de leche and spread lightly over the cream
Take another pancake and lay that on top.
Spoon some of the cream onto the pancake and then add some of the raspberries
Keep repeating this until all the pancakes are used and top with the final pancake
Top off with more raspberries
Melt the chocolate and pour this over the cake
And now it's time to enjoy :)