Monday, 22 July 2013

Strawberry and Mint Jam

Following on from my strawberry recipe trend, I have yet another recipe to share with you...sorry there's a lot of good strawberries around especially after me and my son went fruit picking :)
Jam making is a lot easier than what you would think and honestly, well worth it, the combinations are never ending and you can adapt a simple recipe to exactly your tastes.
I once went to a restaurant that served strawberries with a lovely mint syrup which worked beautifully and that gave me the inspiration to add some mint to my basic strawberry jam recipe and it worked brilliantly, even my husband who struggles to find any compliment in anything I make, managed to say it was the best flavoured jam that he had ever eaten...quite the compliment! So here it is...enjoy 

Strawberry and Mint Jam

1kg strawberries
700g jam sugar
12 mint leaves (depending on taste add more if needed) chopped
Squeeze of lemon
Knob of butter

If like me, you froze your strawberries, then remove from the freezer and defrost overnight, when they have defrosted they will be very soft and they will have released a lot of juice, this is perfect! 

In a jam pan or a heavy based pan, add half the sugar, all the strawberries and there juices, the mint leaves and then top with the remaining sugar, stir through.

If you haven't frozen the strawberries, then you will need to add the strawberries and sugar together and leave for 24 hours to allow the strawberries to break down into the sugar and release its juices.

Turn on to a medium high heat and allow to heat through until the sugar dissolves, then add the squeeze of lemon, turn the heat up until it boils and bubbles, allow it to bubble like this for around 10 minutes, stirring occasionally.
While it bubbles away, add the knob of butter as well

Remove from the heat and allow to cool for around half an hour and then pour into your sterilised jam jars. Allow to cool completely.

The sealed jams will last for a year and once opened pop into the fridge.


Strawberry, Almond and Coconut Crumble

I love a traditional pudding, I would happily say that the crumble is my favourite but I also love Bakewell, cheesecake, bread and butter pudding, well pretty much any pudding...yet I always find something so comforting with a crumble. The only downfall is I would happily eat a several portions, or the whole thing if i had the chance...not like I've ever done that before (well maybe once hehe)
Apple is always the traditional option for a crumble and yes I love that but then I discovered strawberry crumble and that was it....love at first taste! I could happily eat this dessert morning, lunch and dinner, now wouldn't that be fantastic..well as long as my waist line didn't get bigger haha!
To add a little something to an already wonderful crumble I decided to add some tasty coconut (one of my favourites, there's probably not many recipes I don't add this too) and now I truly have died and gone to heaven, it gives this dessert so much depth and extra flavour! If you find yourself with some strawberries lurking in the back of the fridge, I promise you you won't be disappointed 

Strawberry, almond and Coconut Crumble

Filling
600g strawberries, hulled and quartered
20g caster sugar
25g ground almonds
25g dessicated coconut
3 tsp vanilla extract

Crumble
300g plain flour
170g Demerara sugar
200g butter chilled and cut into cubes 
20g ground almonds
85g flaked almonds
100g dessicated coconut

In a deep dish add the strawberries and then add the sugar, ground almonds, dessicated coconut and vanilla extract and stir round

Crumble
In a bowl add the flour and sugar.

Add the butter to the flour and sugar and rub with your fingers to until you get a bread crumb like consistency

Add the ground almonds, flaked almonds and dessicated coconut and stir through

Pour the crumble topping on top of the strawberries and pop into the fridge

Pre heat the oven to 190c/180c fan 

Place the crumble into the oven for around 35 minutes until golden on top

Serve with some double cream or ice cream :))

Perfect summer treat


Thursday, 4 July 2013

Chocolate and Coconut Soda Bread

The last month or so has been pretty busy with this and that and with my cold that I can't seem to shift, I woke up this morning craving something a little sweet, I wasn't in the mood to make a cake, or muffins, so I started to look at making some cookies but I just couldn't decide so then it came to me...a sweet bread :))! I decided on a sweet soda bread, I hadn't tried it before and wasn't even sure it would work but the thought of chocolate and coconut was calling me so off to the kitchen I went and just threw all the ingredients in together and luckily the outcome was wonderful....exactly what I needed and my goodness was it tasty, I even managed to eat half of it before even had time to cool down and trust me the other half tasted just as good once it had cooled down haha...oops :/ 

So here it is, my recipe for Chocolate and Coconut Soda bread. This is like your normal soda bread, obviously because it is sweet but also the fact that it is a little softer once baked, also I used milk chocolate as that is all I had in my cupboards but feel free to use dark chocolate as I am sure that would work fantastic as well especially with the coconut.

Chocolate and Coconut Soda Bread

240g self raising flour
50g dessicated coconut
50g plain whole meal flour
1/2 tsp bicarbonate of soda
Pinch of salt
2 tbsp honey
80g chocolate chunks
250ml coconut buttermilk (250ml coconut milk with 1tbsp lemon juice added and set aside for 20 minutes)

Pre heat the oven to 200/190c fan

Add the flours, dessicated coconut, honey, salt, bicarb of soda and chocolate chunks into a bowl.

Add the coconut buttermilk to the dry ingredients and mix (you may need some more flour if it appears too sticky and wet, depending on your flour so add more self raising flour if needed)

Mix to form a dough and turn out into a lightly floured worktop and knead gently. Form into a round ball and pop onto a lined baking tray and score a cross on the top

Pop into the oven for 30-40 minutes until golden in colour and cooked inside... And enjoy :))


Sunday, 30 June 2013

Strawberries and Cream Shortbread Slices

It's strawberry season and of course Wimbledon so I decided my next recipe would of course be strawberry related....but I have a confession to make, I'm not the biggest fan :( I know how could this be, I actually don't know many people that don't like strawberries but I've never been a big fan, I can quite happily take them or leave them, I'm not that fussed. I have recently tried a couple of recipes with strawberries and I have enjoyed them but I much prefer some
Pineapple or melon :)) but I decided that what the hell lets get into the english summer vibe and do a strawberry treat and this really is such a lovely recipe that even for a short while im a convert...of course you can substitute for raspberries and it tastes just a nice, trust me I've done both hehe :))

So here it is, this is a great snack and fab for picnics and if you really wanted to go all out why not add some custard....not like I've ever done it....ummmmm :/

Strawberries and Cream Shortbread Slice

250g butter softened
90g caster sugar (and extra for sprinkling) 
1 tsp vanilla extract
250g plain flour
140g semolina

8 tbsp strawberry jam
12 tsp mascarpone 

Pre heat the oven to 180/170c fan
Lightly butter a 20cm square tin, loose base or shallow or a foil tin which works really well with this.

In a bowl add the butter, sugar and beat until light and fluffy.
Ad the vanilla extract and mix well

Add the flour and semolina and mix in, use your hands to bring the dough together

Split the dough into two and take one half and put this into the bottom on the pan and pat down to cover the bottom.

Spread over the strawberry jam being careful not to move the shortbread dough

Spoon on the mascarpone

Roll out the other piece of dough and careful place on top of the jam and mascarpone, the dough is quite crumbly so don't worry if it breaks just join the pieces and smooth over 

Prick the top with a fork all over and pop into the oven for 30 minutes until it starts to go golden round the edges

Remove from the oven and allow to cool completely and then sprinkle with some caster sugar and cut into squares :))

Please feel free to use any other flavour jam such as raspberry which also works really well in this recipe or even some gooseberries :))

Adapted from a good food recipe 


Cheese Stuffed Tear and Share Garlic Dough Balls

I am a sucker for garlic bread in any shape and form and this weekend I was definitely in a garlic bread mood.
I hadn't made my sticky ribs in a while and this was a perfect opportunity to enjoy it with some potato wedges, corn on the cob and some yummy garlic bread, and my recipe makes it a great get together food as well :))

Cheese stuffed Tear and Share Garlic Dough Balls

Pizza dough
250g strong white bread flour
5g fast action yeast
1 tsp salt
1 tbsp garlic olive oil
150ml lukewarm water

1 pack of buffalo Mozzarella 

4 tbsp butter melted
1 large garlic clove

Make up the dough by adding the flour, yeast, salt and oil to a bowl. Add the water and mix to form a dough. 
Knead the dough on a floured work surface for around 8-10 minutes until smooth and elastic

Place in a lightly oiled bowl and cover with cling film and leave to rest in a warm place for around an 1 1/2-2 hrs until doubled in size

Cut up the mozzarella into small pieces 1cm squared 

Melt the butter in a bowl and add the garlic and mix well 

Lightly butter an 8" round cake tin (loose bottom is best) 

Turn the risen dough out onto a lightly oiled worktop

Tear off small pieces and flatten it in your hand, place one or two pieces of the mozzarella into the centre of your flatten dough and then cover the cheese with the dough, by pinching the sides up into the centre and seal as best you can.

Using a pastry brush, brush over a little of the garlic butter all over the  dough ball and place in the cake tin.

Repeat this until all the dough has been used, don't pack the dough balls into too much as they will rise and join.

Cover with cling film and leave to rest until risen. I leave mine in the top oven while the bottom oven is heating up and it takes only about 20 minutes for the dough to rise again.

Pre heat the oven to 220/200c fan

Once risen sprinkle with some Parmesan cheese and pop in the oven for around 15-18 minutes until golden on top

Remove from the oven and remove from the pan and serve warm :))

Sunday, 23 June 2013

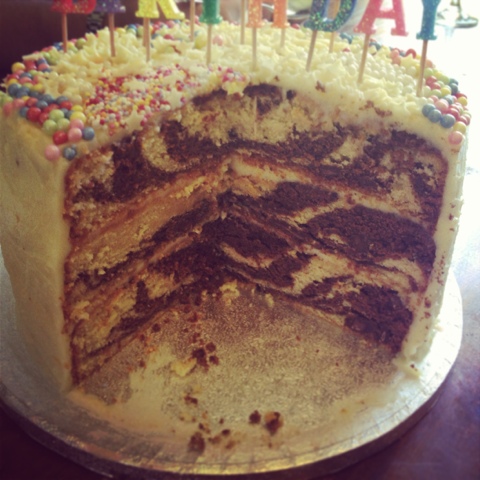
Chocolate Chip and Orange Zebra Cake

It was my hubby's birthday and I wanted to make him a special cake, but this is a man that doesn't really appreciate baking in any form really...well he says he doesn't but normally when he has a bit of cake he enjoys it hahaha! So I decided that I would make a cake regardless of him and let everyone else enjoy it hehehehe :)) I really wanted to try something different and had seen this new idea of a zebra cake but I didn't want just plain chocolate and plain sponge and certainly not a pink version :))! So I came up with Chocolate Chip and Orange Zebra Cake and must I just say wow wow wee, it was fantastic!!!!
I came up with a new sponge and added the orange flavour as well some cocoa powder to half the batch and some good chocolate chunks (not chips, there are far too small) and it produced the most heavenly cake which received the comments "it's the best cake I've ever tasted!" And "it's like eating a Terry's chocolate orange...but in cake form!" I'm happy with those comments and for such a large cake, there wasn't much left hehe :) 
As mentioned this is quite a large cake but is a really fantastic celebration cake...so here's the recipe and I really hope you enjoy it :)

Chocolate Chip and Orange Zebra Cake

450g butter softened
300g caster sugar
150g soft brown sugar
450g self raising flour
70g ground almonds
2 tsp baking powder
6 eggs
300ml natural yoghurt
2 tsp vanilla extract
Zest of 2 oranges
7 tbsp cocoa powder
100g chocolate chunks 


Butter and flour 3 x 20cm (8") cake tins
Pre heat the oven to 180/170c fan

In a large bowl add the softened butter and sugars and mix well.
Add the flour, ground almonds and baking powder and mix until incorporated. 
Add the eggs and mix them in, once incorporated add the yoghurt and vanilla extract and mix to form a nice smooth batter. Add the zest of the two oranges and mix in.

Pour half the mixture into another bowl and add the cocoa powder and stir this in until the cocoa powder has disappeared completely into the batter, then add the chocolate chips and stir in.

Line the three tins in a row and get the two batters ready

Get large serving spoons ready (2...1 for the plain orange batter and 1 for the chocolate orange batter) 

Starting with the plain orange batter, spoon (1 spoonful) some into the middle of the first tin, then repeat with the other two tins

Then spoon the chocolate orange batter on top of the plain orange batter and do in all tins

Repeat with the plain orange batter and spoon some on the chocolate batter, then the plain and then the chocolate...keep spooning each layer of flavour into the next. If you do the three tins at the same time, you should end up with the same amount of batter in each tin and the layers will be equal - if you struggle with this, feel free to just do a marble effect!

Pop into the pre heated oven for around 30 minutes (could be up to 40 minutes depending if the layers are equal)

Remove once a skewer inserted comes out clean

Allow to cool and remove from the tins 

Orange Cream Cheese Frosting

140g butter softened
200g cream cheese
200g mascarpone
200g icing sugar
Zest of 1 orange

In a bowl mix the butter until lovely and soft 

Add the cream cheese, mascarpone and orange zest and mix with the butter until smooth (do not over mix as it will become runnier the more you mix)

Sift the icing sugar and mix until fully Incorporated (but remember...don't over mix)

Place one of the layers on a plate, cake stand or cake board

Spoon some of the cream cheese frosting on the top and with a palette knife smooth around the top of the cake

Place another layer on top of the bottom layer and again spoon some of the cream cheese frosting and smooth on

Place the final layer on top 

Now it's time to cover the cake, as the cake is darker underneath, it's worth getting a thin layer round the edge (crumb layer) and pop in the fridge to set to then finish off with another layer of frosting. The top is normally okay so cover the top with a good layer to begin with.

If you are preparing this a day before, pop the finished cake in the fridge and remove a couple of hours before serving so as to bring to room temperature.

And now it's time to enjoy :))


Saturday, 22 June 2013

Great ideas for leftover cake...well that's if you have any :))

I do a lot of cakes for friends and family and sometimes find I have leftover layers or off cuts and rather than throw them out or just eat them myself, I decided to try and use them more efficiently so here are two ideas that I made recently which went down very well with my son and were great additions to his lunch box treat :))

Leftover Cake and a fruit Kebabs
These are great as a treat for kids or even for a party, just cut the cake into cubes and alternate on a skewer with your choice of fruit. For the dip, mix some cream cheese with some icing sugar, a little vanilla extract and add some milk until you get a soft consistency and for another option, why not add some citrus curd or jam to the dip for a fruity taste :))

Mini layered cakes
cut out two rectangles, and layer it with sweetened cream cheese, lemon curd and some blueberries...perfect pudding for packed lunches...add your favourite fruit and jam or curd depending on your tastes

Don't worry these ideas are not dependent on having leftover cake...you can always make some cake just to make up these sweet little treats hehe :))