Friday 31 May 2013

Lemon and Raspberry Cheesecake Ice Lollies

It's national ice cream week so here's a fantastic recipe that you must try out...Lemon and Raspberry Cheesecake Ice Lollies! They are so easy to make and kids and adults a like we love these :))

Lemon and Raspberry Cheesecake Ice Lollies 

8oz (225g) cream cheese
1/4 cup sour cream
1/2-3/4 cup icing sugar
1/3 cup milk
zest of two lemons
10 raspberries

6 digestive biscuits
1 tbsp butter

In a food processor add the cream cheese, sour cream, icing sugar and milk, process until well combined. Add the lemon zest and raspberries and pulse to combine.
In a food processor add the digestive biscuits, process until it resembles fine bread crumbs.
While food processor is running, add the melted butter in a slow stream until the mixture resembles wet sand.
Pour the cheesecake mixture into the ice lolly molds, leaving about 1 inch of the top empty for the crust. 
Divide the crust evenly between the ice lollies, press down gently to compact. Freeze and enjoy :))


Fruit Pizza....wonderful :)

Fruit Pizza...I know it sounds weird but trust me it tastes wonderful and is also a great one for kids to make and they can add all their favourite fruits and enjoy as a healthy pudding :))

Fruit Pizza

Pizza base (please refer to my pizza dough recipe)
3 heaped tbsp Mascarpone
1 tbsp icing sugar
2 tbsp lemon curd
Mix of fruit - I used one pear, a banana, some blueberries and some cherries...feel free to use any fruit you fancy
Milk/dark/white chocolate shavings 

Make up the pizza dough as per my recipe

Roll out the dough and place on a baking tray and bake for around 15-18 minutes until golden ( you can also dry fry it until golden) and allow to cool

Mix the mascarpone and the icing sugar until fully incorporated and the mascarpone is soft enough to spread

Spread the mascarpone onto the pizza base followed by the lemon curd

Then arrange the fruit on top and sprinkle with chocolate shavings or melted chocolate :))

And tuck in :))


Wow wee pizza :))

Who needs a bought pizza...update your own homemade pizza with a cheese stuffed crust and some tasty meatballs :)) I just used some leftover chorizo and Manchego cheese meatballs and stuffed the crust with Manchego cheese and it turned out to be the best pizza ever :))

Refer to my pizza base recipe and chorizo and Manchego cheese meatball recipe :)


Jam Doughnuts

Who can resist a jam doughnut...not me and that was apparent when I made some and ate 4...oops! They are a lot easier to make than you would think and taste ever so yummy when homemade, plus you can add any filling you want, jam, custard, Nutella, nuts and spices or why not coat them in a cinnamon sugar instead of just sugar...possibilities are endless but here's the recipe :))

Jam Doughnuts

For the dough
500g strong white flour
50g caster sugar
40g butter
2 large range eggs
14g instant yeast
10g salt
150ml warm milk
130ml water
For the filling
strawberry or raspberry jam

For the dough, place all ingredients into a large bowl holding back a quarter of the water.
Stir with your hands until a dough is formed.
Slowly add the remaining water and knead the dough in the bowl for four minutes. (Alternatively, you could mix with a stand mixer fitted with a dough hook).
Tip dough onto a lightly floured surface and knead well for 10 minutes, until the dough is smooth and elastic.
Place the dough into a clean bowl, cover with a damp tea towel and leave to rise for an hour.
Tip the dough out onto a very lightly floured surface, and knock it back by kneading it a few times.
Divide the dough into 12 equal portions and shape each portion into a ball.
Place all balls onto a floured baking tray and allow to rise for an hour.
Preheat a deep fat fryer, filled with sunflower oil, to 180C/350F.
Lower each doughnut into the fryer, cooking each side for about five minutes or until golden brown. Remove the doughnuts from the oil with a slotted spoon and immediately roll in caster sugar so that the hot fat makes the sugar stick to the sides.
Set aside and leave to cool.
When completely cool, using a small, sharp, knife or skewer make a cut into the side of the doughnut, reaching to the centre.
Spoon some smooth or sieved strawberry/raspberry jam into a piping bag, or piping syringe.
Pipe, or syringe, the jam generously inside.

Recipe from Paul Hollywood

This does make a dozen doughnuts so feel free to halve the recipe if you wanted :))

Sorry about the picture, I was too busy eating and forgot to take a picture so I took one of my half eaten doughnut hahaha :))


Wednesday 29 May 2013

Chicken and Butternut Squash Tagine

As you all know, Moroccan food is one of my favourites and I love to play around with new flavours and variations to create something Moroccan. I had some fab butternut squash to use up so I went for a Chicken and Butternut Squash Tagine, by adding in my favourite Moroccan spices I created this wonderful hearty and warm dish that is an absolutely wonderful family meal...serve with some nutty Pilaf rice or some flavoured couscous and you also have a great meal to serve lots of hungry guests. (I apologise for the picture, it's was really difficult trying to take a nice picture when I had my hungry boys tucking into dinner hahaha)

Chicken and Butternut Squash Tagine

4 chicken thighs
1 onion chopped
250g butternut squash peeled and cut into chunks
2 tsp ras el hanout
1 tsp cumin
1 1/2 tsp cinnamon
1/2 tsp turmeric
2 tbsp honey
1 tbsp flour
Large handful of raisins
300ml chicken stock
3/4 tin chopped tomatoes

Pre heat the oven to 150/140 fan
Heat some oil in a casserole pan or tagine
Add the chicken thighs and cook both sides until golden (you don't want to cook them through just give them a bit of colour) remove from the pan and set aside
Add the chopped onion and cook until slightly soft and then add diced butternut squash and cook for a further couple of minutes 
Add 2 tsp ras el hanout, 1 tsp cumin, 1 1/2 tsp cinnamon, 1/2 tsp turmeric, 2 tbsp honey and stir well to coat the onion and butternut. Tip in the raisins and cook for a couple of minutes, add extra oil if it seems a little dry
Place the chicken back in the pan and stir through to coat well with all the spices, add the flour and cook for 1 minute 
Add 300ml chicken stock and the tin tomatoes
Bring to the boil and then place in the oven at 150/140 fan to slow cook for around 2 1/2 hours 

Serve with couscous or rice

This is a fairly sweet fragrant tagine so if you like a slight spicy taste then please feel free to add 1/2-1 tsp cayenne pepper 

Pitta bread...easy to make and nicer than shop bought

This is certainly I recipe I like to use a lot, it's easy to do and the results are fantastic. I love a good pitta bread, it's so versatile, stuffed with almost anything and you have a great lunch or dinner and even a breakfast. They only need proving once so they don't take as long as most breads and they cook within a couple of minute, which is perfect for me! 

Pitta Bread

250g strong white flour
7g fast action yeast
1 tsp salt
160ml tepid water
2 tsp olive oil

Semolina for dusting

In a bowl, mix together the flour, yeast and salt. Add the olive oil and start to add the water until it come together to form a soft dough
Place the dough on the worktop and knead for around 5-10 minutes. place it into a lightly oiled bowl. Cover and leave to prove until doubled in size.
Preheat the oven to 220/200 c fan and place a baking tray or baking stone on the middle shelf.
When the dough has doubled in size, tip it out onto a work surface dusted with flour/semolina and Knock the dough back by folding it inwards over and over again until all the air is knocked out. Split the dough into 6 equally sized balls. Roll each ball into an oval shape 3mm thick.
Remove the hot tray from the oven, dust with semolina and place the pitta breads on it. I cook mine two at a time so keep the remaining balls in the bowl covered with a tea towel until raft to roll out.
Bake for about 5-7 minutes, or until they just start to colour. Remove them from the oven and place on a plate and cover with a tea towel or cling film and continue with the remaining dough dusting the baking tray each time with semolina

Recipe from Paul Hollywood 

Coffee, Caramel, Walnut Cake with Caramel Filling and Coffee Mascarpone Icing

 I was asked recently to help out with a charity bake sale in aid of SANDS (still born and neonatal death charity) for a local hospital. As you know I love to bake and this was made even better by the fact that it was for a good cause. I decided to make two cakes, one being my famous Coffee, Caramel, Walnut Cake with a caramel filling and a coffee mascarpone icing. When I recreate a classic I love to out my own spin on it and with the addition of brown sugar in the cake recipe it gives it a lovely caramel flavour which is wonderful, add the caramel filling and the coffee mascarpone icing and this really is a truly wonderful cake that everyone will enjoy :))

Coffee Caramel Walnut Cake

175g unsalted butter, cubed and softened, plus extra to grease 
85g walnuts (toasted) plus 8 to go on top
175g soft muscovado sugar
3 eggs, beaten 
150g self-raising flour
½ tsp baking powder
50ml instant coffee

Icing
250g mascarpone
1 1/2 tsp instant coffee mixed with 1 tsp water
85g icing sugar 

Soft Caramel- either homemade or shop bought

Preheat the oven to 180C/170c Butter 2 round 20cm cake tins. In a food processor, blitz two-thirds of the toasted walnuts to powder. Cream the butter in a bowl with the sugar until light and fluffy. Gradually beat in the eggs then add the blitzed walnuts and gently stir through. 
Fold the flour, baking powder and a pinch of salt until just incorporated. 
Roughly chop the rest of the walnuts and stir through the cake mixture with the instant coffee. Evenly divide the mixture between the cake tins and bake in the oven for about 20 minutes, until lightly golden and cooked through when tested with a skewer. Cool the cakes in the tins for 5 minutes, then transfer to a wire rack 
For the filling,  
For the icing, in a bowl mix the mascarpone with the icing sugar until smooth and add the instant coffee and mix through
Take one of the cakes and place on a plate. Spread over a layer of caramel sauce all over the top.
On the other cake turn upside down and spread half the coffee icing evenly over and place this on top of the other cake.
Using the remaining coffee icing, spread evenly over the top and finish off with the whole walnut pieces :)


Tuesday 28 May 2013

Coconut and Cinnamon Crispy Chicken

The other night I was pretty pushed for time as me and my son had busy all day and I had some chicken thighs marinating in some buttermilk but hadn't actually decided what I was going to coat them in until we bought some flavoured popcorn and it gave me a brainwave...I know strange ehh it comes to me in the strangest ways hehe! Anyway this was a caramel, cinnamon and coconut flavour popcorn and while I was eating it I thought that (without the caramel) it would taste pretty darn good on some chicken so off I went home to the kitchen and made a coconut and cinnamon breadcrumb for my chicken and it was fantastic...just enough coconut and cinnamon flavour to make our dinner something different and flavoursome :)) it even got a huge thumbs up from my son...mission accomplished! The secret to moist and tender breaded chicken whether its fried or oven cooked is to marinate it in buttermilk...honestly it's works wonders :)

Coconut and Cinnamon Crispy Chicken

4 chicken thighs
250ml buttermilk or 250ml milk and 1 tbsp lemon juice

2 -3 slices of bread
5 tbsp desiccated coconut 
3/4 tsp cinnamon (ground)
Salt and pepper

Plain flour
1 egg (beaten)

Pour the buttermilk into a deep bowl (or add the milk and lemon juice and allow to stand for 10 minutes) 
Add the chicken thighs and cover with cling film for at least 3 hours, overnight is good too

Pre heat the oven to 190/180c fan

Place the bread in a food processor and blitz to form breadcrumbs. Add the desiccated coconut and the ground cinnamon and salt and pepper and blitz again until fully incorporated. Pour this on to a plate.

Pour a little flour onto a plate and the beaten egg on another

Lift the chicken out of the buttermilk and place in the flour bowl. Coat with flour and add the chicken to the egg bowl and cover with the egg. Then finally add the chicken to the coconut/cinnamon breadcrumbs and coat fully.

Place on a lined baking tray and repeat with the remaining chicken thighs

Spray a little olive oil finely over the chicken

Pop into the oven for around. 30-40 minutes until golden in colour and the chicken is cooked

I served mine with garlic and cinnamon roasted veg and chips


Coconut crazy :))

I told you I had gone coconut crazy...this time with a coconut bread! I had seen the recipe on smitten kitchens website so I knew I had to make it! It's a really nice sweet bread, a great alternative to banana bread

Coconut Bread

2 large eggs
295 ml milk
1 teaspoon vanilla extract
2 1/2 cups (315 grams) plain flour
1/4 tsp salt 
2 tsp  baking powder
1 tsp ground cinnamon
1 cup (200 grams) caster sugar
140 grams) dessicated coconut 
85 grams butter, melted or melted and browned, if desired

Heat oven to 180/170c fan degrees. In a jug, whisk the eggs, milk and vanilla extract 

In a medium bowl, sift together flour, salt, baking powder and cinnamon. Add sugar and coconut, and stir to mix. Make a well in the center, and pour in egg mixture, then stir until just combined. Add melted butter, and stir until just smooth — be careful not to overmix.

Butter and flour a 9×5-inch loaf pan, Pour batter in pan and bake until a toothpick inserted into the center comes out clean, anywhere from 1 to 1 1/4 hours. Cool in the pan for five minutes, before turning out onto a cooling rack.

Cut into thick slices with a nice bit of butter or even some lovely lemon curd :))

Adapted from a recipe from smitten kitchen

Coconut and Blueberry Muffins

It's pretty safe to say I love nuts, I could eat them all day and coconut is no exception so I have taken it upon myself to cook with it as much as I can haha...firstly was the chickpea and spinach coconut curry with coconut rice a little while ago and I'm following on with a sweet coconut recipe...Coconut and Blueberry Muffins :) I enjoy a good muffin but these are amazing...moist, soft, flavoursome! I wanted to find a way of making sure I captured a good coconut flavour so I actually use both dessicated coconut and coconut cream in the recipe and it works brilliantly. These muffins are so easy to make and taste wonderful. I've already received comments on my Facebook page from people who have made them saying how good they taste :))

Coconut and blueberry muffins

300g self-raising flour
150g caster sugar
40g  desiccated coconut
100ml oil
125ml coconut cream
1/2 tsp salt
2 eggs, lightly whisked
100g blueberries

Preheat oven to 180°C. Line a muffin tin with muffin cases.
Combine the flour, sugar and coconut and salt in a bowl. Add the blueberries and stir through.
Add the oil, coconut cream and egg to a jug and whisk until slightly frothy. 
Pour the liquid into the dry ingredients and gently fold until just combined, no more than 10 stirs. 
Spoon into the muffin cases.
Bake for 25 minutes or until a skewer inserted into the centres comes out clean. Allow to cool


Churros....oh yes please :)))

This is my all time favourite sweet treat, being from Spain they remind me of Spanish markets with the Churros vendors or breakfast in a Spanish cafe :)) I never thought I would be able to recreate the exact taste but I did it...they are amazing and taste identical...don't be fooled into the recipes with egg, Churros did not have egg in! They are so simple and make and perfect to feed some hungry mouths quickly :))

Churros

1 cup water
2 1/2 tbsp caster sugar
1/2 tsp salt
2 tbsp vegetable oil
1 cup plain flour
2 vegetable oil for frying
1/2 cup white sugar, or to taste

In a small saucepan over medium heat, combine water, 2 1/2 tbsp sugar, salt and 2 tbsp vegetable oil. Bring to a boil and remove from heat. Stir in flour until mixture forms a ball.
Heat oil for frying in deep-fryer or deep pan to 375 degrees F (190 degrees C). Using a piping bag or churrera, pipe strips of dough into hot oil. Fry until golden; drain on paper towels.
Roll the churros in the sugar. Add cinnamon to the sugar if wanted :)


Lamb and Goats Cheese Gozleme

Filled bread is always a winner in my house and this recipe is no exception...a traditional Turkish food tweaked a little and absolutely wonderful for a picnic, lunch or to accompany a dinner for a crowd...perfect :))

Lamb and Goats Cheese Gozleme

Dough

250g strong white bread flour
7g fast action yeast
1 tsp caster sugar
1 tsp salt
2 tbsp olive oil
175ml Luke warm water

Filling
500g minced lamb
1 onion chopped 
2 garlic cloves
2 tsp ground cumin
2 tsp ground coriander
2 tsp cinnamon
1 tsp mild chilli powder
50g raisins
Zest of a lemon
70g toasted pine nuts
100g soft goats cheese

In a bowl add the flour, salt, sugar and yeast and then add the olive oil and water and mix to form a dough. Knead for about 8-10 minutes and place in an oiled bowl and set in a warm place for about 2 hours until doubled in size

Heat some olive oil in a frying pan and add the onion and fry until nice and soft. Add the garlic and the spices and cook for a further minute. Add the raisins and stir in.
Add the minced lamb and stir through until cooked. Add the lemon zest and toasted pine nuts, stir in and set aside.

Knock back the dough and divide the dough into 4 (makes large gozlemes) or 6-8 (small individual ones) and roll out into rectangles about 3mm thick.

Spoon some of the lamb mixture onto one side of the rectangle leaving a 1cm border round the edge (to seal) and add a little of the goats cheese on top of the lamb mixture and fold over the other side of the rectangle dough to cover the lamb mixture and pinch down around the edges. 

Heat a dry frying pan on a medium high heat and place the gozleme in the frying pan and cook until golden and then turn over and repeat on the other side.
Remove from the pan and place on a plate and cover with a tea towl to keep warm (and to stop them from drying out) while you continue with the remaining gozleme. 

Serve with a Mediterranean salad or salsa and a light dip. 

They last a couple of days in the fridge and still taste lovely :))

You will probably have some filling left over, but can be frozen to use again.

Butternut Squash and Onion Bhajis

Either a perfect snack or accompaniment to a curry, these onion and butternut squash Bhajis are wonderful :))

Butternut squash and Onion Bhajis

3 tbsp mild curry paste
200g gram flour ( chickpea flour)
( you can use plain flour if you wanted)
1 tsp baking powder
1 1/2 tbsp garam masala
1 tsp turmeric
2 medium onions (finely sliced- you can if course dice these if you wanted)
250g butternut squash (peeled and coursely grated)
Vegetable oil for deep frying

Mix the curry paste with 250ml of cold water and set aside

Mix the flour, baking powder, turmeric, garam masala in a bowl and pour in the curry paste/water mixture and mix to form a thick batter. Stir in the onions and the butternut squash

Heat a deep pan with oil and add heaped tablespoons of the batter into the oil. Turn occasionally and they should take about 5-6 minutes to puff up and go golden in colour.

Remove with a slotten spoon and place on some kitchen paper and continue with the rest

Mix some yoghurt with some mango chutney for a nice sweet cooling dip for the Bhajis  

Adapted from a good food recipe

Another middle eastern recipe :)

As you may all be aware...Me and my son love middle eastern food (slight understatement) my hubby on the other hand, can take it or leave it so when I make it its rare or when he's not home for dinner hehe! I wanted to try another recipe that was quick and easy to make and perfect family meal, here it is adapted a lot for me and my family's taste but full of middle eastern flavour and perfect for the whole family :))

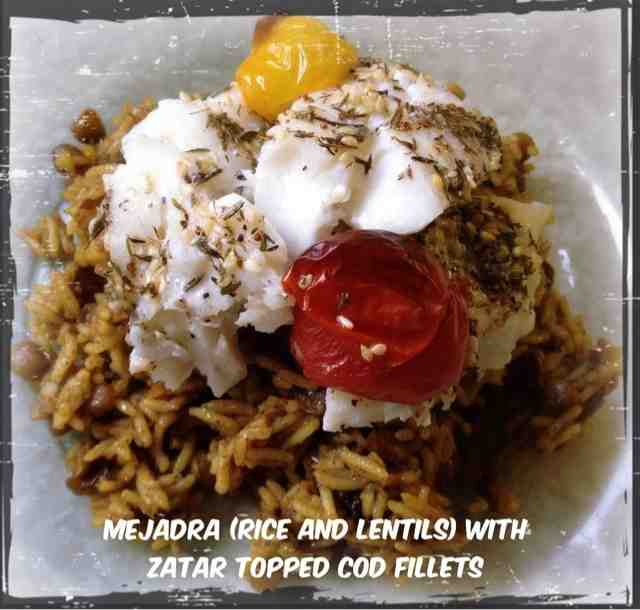
Mejadra (rice and lentils)

2 large onions
3 tbsp honey
1 tsp ras el hanout
Salt and pepper
250g green lentils (tinned) 
2 tsp ground cumin
1½ tbsp ground coriander
200g basmati rice
2 tbsp olive oil
½ tsp ground turmeric
1½ tsp ground allspice
1½ tsp ground cinnamon
1 tsp sugar
Salt and black pepper
350ml water

Heat the oil in a pan. Add the onion, honey, ras el hanout and some salt and pepper on cook on a low heat for about 10 minutes until nice and caramelised and golden colour.
Heat the olive oil and a little butter in a saucepan, add the turmeric, allspice, cinnamon, sugar, salt and pepper and then add the rice and coat well with the oil and spices. Then add the lentils and water. Bring to a boil, cover and simmer on very low heat for 15 minutes.
Remove from the heat and add the caramalised onions and stir gently with a fork. 

Recipe adapted a lot from a yotam ottolenghi recipe 

Zatar topped Cod fillet

I sprinkled some Zatar spice mix on to the cod fillets with a drizzle of garlic oil and placed in the oven for around 15 minutes at 160/150c until the fish flaked nicely :) (I also added some cherry tomatoes to roast with the cod)

Place some of the rice on a plate and top with the cod and squeeze some lemon juice over the cod and enjoy :))