Sunday 30 June 2013

Strawberries and Cream Shortbread Slices

It's strawberry season and of course Wimbledon so I decided my next recipe would of course be strawberry related....but I have a confession to make, I'm not the biggest fan :( I know how could this be, I actually don't know many people that don't like strawberries but I've never been a big fan, I can quite happily take them or leave them, I'm not that fussed. I have recently tried a couple of recipes with strawberries and I have enjoyed them but I much prefer some
Pineapple or melon :)) but I decided that what the hell lets get into the english summer vibe and do a strawberry treat and this really is such a lovely recipe that even for a short while im a convert...of course you can substitute for raspberries and it tastes just a nice, trust me I've done both hehe :))

So here it is, this is a great snack and fab for picnics and if you really wanted to go all out why not add some custard....not like I've ever done it....ummmmm :/

Strawberries and Cream Shortbread Slice

250g butter softened
90g caster sugar (and extra for sprinkling) 
1 tsp vanilla extract
250g plain flour
140g semolina

8 tbsp strawberry jam
12 tsp mascarpone 

Pre heat the oven to 180/170c fan
Lightly butter a 20cm square tin, loose base or shallow or a foil tin which works really well with this.

In a bowl add the butter, sugar and beat until light and fluffy.
Ad the vanilla extract and mix well

Add the flour and semolina and mix in, use your hands to bring the dough together

Split the dough into two and take one half and put this into the bottom on the pan and pat down to cover the bottom.

Spread over the strawberry jam being careful not to move the shortbread dough

Spoon on the mascarpone

Roll out the other piece of dough and careful place on top of the jam and mascarpone, the dough is quite crumbly so don't worry if it breaks just join the pieces and smooth over 

Prick the top with a fork all over and pop into the oven for 30 minutes until it starts to go golden round the edges

Remove from the oven and allow to cool completely and then sprinkle with some caster sugar and cut into squares :))

Please feel free to use any other flavour jam such as raspberry which also works really well in this recipe or even some gooseberries :))

Adapted from a good food recipe 


Cheese Stuffed Tear and Share Garlic Dough Balls

I am a sucker for garlic bread in any shape and form and this weekend I was definitely in a garlic bread mood.
I hadn't made my sticky ribs in a while and this was a perfect opportunity to enjoy it with some potato wedges, corn on the cob and some yummy garlic bread, and my recipe makes it a great get together food as well :))

Cheese stuffed Tear and Share Garlic Dough Balls

Pizza dough
250g strong white bread flour
5g fast action yeast
1 tsp salt
1 tbsp garlic olive oil
150ml lukewarm water

1 pack of buffalo Mozzarella 

4 tbsp butter melted
1 large garlic clove

Make up the dough by adding the flour, yeast, salt and oil to a bowl. Add the water and mix to form a dough. 
Knead the dough on a floured work surface for around 8-10 minutes until smooth and elastic

Place in a lightly oiled bowl and cover with cling film and leave to rest in a warm place for around an 1 1/2-2 hrs until doubled in size

Cut up the mozzarella into small pieces 1cm squared 

Melt the butter in a bowl and add the garlic and mix well 

Lightly butter an 8" round cake tin (loose bottom is best) 

Turn the risen dough out onto a lightly oiled worktop

Tear off small pieces and flatten it in your hand, place one or two pieces of the mozzarella into the centre of your flatten dough and then cover the cheese with the dough, by pinching the sides up into the centre and seal as best you can.

Using a pastry brush, brush over a little of the garlic butter all over the  dough ball and place in the cake tin.

Repeat this until all the dough has been used, don't pack the dough balls into too much as they will rise and join.

Cover with cling film and leave to rest until risen. I leave mine in the top oven while the bottom oven is heating up and it takes only about 20 minutes for the dough to rise again.

Pre heat the oven to 220/200c fan

Once risen sprinkle with some Parmesan cheese and pop in the oven for around 15-18 minutes until golden on top

Remove from the oven and remove from the pan and serve warm :))

Sunday 23 June 2013

Chocolate Chip and Orange Zebra Cake

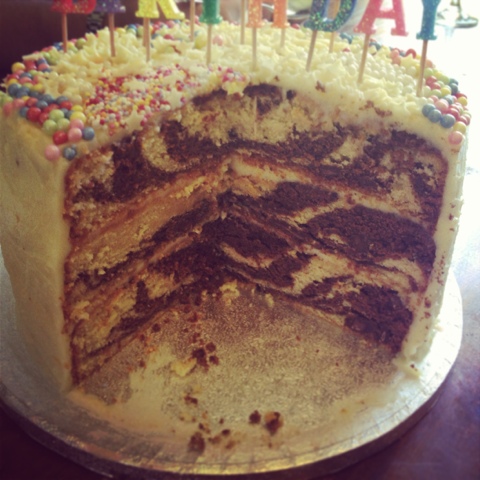
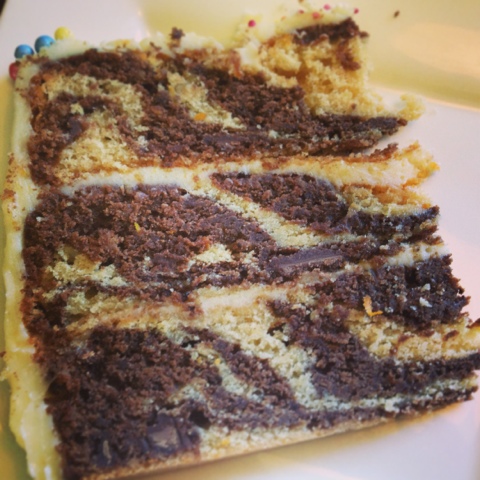
It was my hubby's birthday and I wanted to make him a special cake, but this is a man that doesn't really appreciate baking in any form really...well he says he doesn't but normally when he has a bit of cake he enjoys it hahaha! So I decided that I would make a cake regardless of him and let everyone else enjoy it hehehehe :)) I really wanted to try something different and had seen this new idea of a zebra cake but I didn't want just plain chocolate and plain sponge and certainly not a pink version :))! So I came up with Chocolate Chip and Orange Zebra Cake and must I just say wow wow wee, it was fantastic!!!!
I came up with a new sponge and added the orange flavour as well some cocoa powder to half the batch and some good chocolate chunks (not chips, there are far too small) and it produced the most heavenly cake which received the comments "it's the best cake I've ever tasted!" And "it's like eating a Terry's chocolate orange...but in cake form!" I'm happy with those comments and for such a large cake, there wasn't much left hehe :) 
As mentioned this is quite a large cake but is a really fantastic celebration cake...so here's the recipe and I really hope you enjoy it :)

Chocolate Chip and Orange Zebra Cake

450g butter softened
300g caster sugar
150g soft brown sugar
450g self raising flour
70g ground almonds
2 tsp baking powder
6 eggs
300ml natural yoghurt
2 tsp vanilla extract
Zest of 2 oranges
7 tbsp cocoa powder
100g chocolate chunks 


Butter and flour 3 x 20cm (8") cake tins
Pre heat the oven to 180/170c fan

In a large bowl add the softened butter and sugars and mix well.
Add the flour, ground almonds and baking powder and mix until incorporated. 
Add the eggs and mix them in, once incorporated add the yoghurt and vanilla extract and mix to form a nice smooth batter. Add the zest of the two oranges and mix in.

Pour half the mixture into another bowl and add the cocoa powder and stir this in until the cocoa powder has disappeared completely into the batter, then add the chocolate chips and stir in.

Line the three tins in a row and get the two batters ready

Get large serving spoons ready (2...1 for the plain orange batter and 1 for the chocolate orange batter) 

Starting with the plain orange batter, spoon (1 spoonful) some into the middle of the first tin, then repeat with the other two tins

Then spoon the chocolate orange batter on top of the plain orange batter and do in all tins

Repeat with the plain orange batter and spoon some on the chocolate batter, then the plain and then the chocolate...keep spooning each layer of flavour into the next. If you do the three tins at the same time, you should end up with the same amount of batter in each tin and the layers will be equal - if you struggle with this, feel free to just do a marble effect!

Pop into the pre heated oven for around 30 minutes (could be up to 40 minutes depending if the layers are equal)

Remove once a skewer inserted comes out clean

Allow to cool and remove from the tins 

Orange Cream Cheese Frosting

140g butter softened
200g cream cheese
200g mascarpone
200g icing sugar
Zest of 1 orange

In a bowl mix the butter until lovely and soft 

Add the cream cheese, mascarpone and orange zest and mix with the butter until smooth (do not over mix as it will become runnier the more you mix)

Sift the icing sugar and mix until fully Incorporated (but remember...don't over mix)

Place one of the layers on a plate, cake stand or cake board

Spoon some of the cream cheese frosting on the top and with a palette knife smooth around the top of the cake

Place another layer on top of the bottom layer and again spoon some of the cream cheese frosting and smooth on

Place the final layer on top 

Now it's time to cover the cake, as the cake is darker underneath, it's worth getting a thin layer round the edge (crumb layer) and pop in the fridge to set to then finish off with another layer of frosting. The top is normally okay so cover the top with a good layer to begin with.

If you are preparing this a day before, pop the finished cake in the fridge and remove a couple of hours before serving so as to bring to room temperature.

And now it's time to enjoy :))


Saturday 22 June 2013

Great ideas for leftover cake...well that's if you have any :))

I do a lot of cakes for friends and family and sometimes find I have leftover layers or off cuts and rather than throw them out or just eat them myself, I decided to try and use them more efficiently so here are two ideas that I made recently which went down very well with my son and were great additions to his lunch box treat :))

Leftover Cake and a fruit Kebabs
These are great as a treat for kids or even for a party, just cut the cake into cubes and alternate on a skewer with your choice of fruit. For the dip, mix some cream cheese with some icing sugar, a little vanilla extract and add some milk until you get a soft consistency and for another option, why not add some citrus curd or jam to the dip for a fruity taste :))

Mini layered cakes
cut out two rectangles, and layer it with sweetened cream cheese, lemon curd and some blueberries...perfect pudding for packed lunches...add your favourite fruit and jam or curd depending on your tastes

Don't worry these ideas are not dependent on having leftover cake...you can always make some cake just to make up these sweet little treats hehe :))


Wednesday 19 June 2013

Basque Scrambled Eggs

I love to try new recipes or different ways to do a particular food and one food that I must say rates low on my chart for creativity is Eggs...don't get me wrong I love eggs, fried, boiled, scrambled, poached, or as an omelette but I must say its same old same old and can get pretty boring, so I decided after a morning of craving some egg that I would have them for dinner but something different...and then i remembered...Basque Scrambled Egg :) The Spanish are well known for their tortillas and this is another very popular egg dish that is mainly served in small portions with a tapas meal, I added a few different ingredients (as I had some left over in the fridge) but feel free to leave these out and stick with the more traditional version :)

Basque Scrambled Eggs

4 eggs beaten and seasoned well
1 onion diced
2 garlic cloves crushed
100g cooking chorizo
1 red pepper cut into 1cm bits
1/2 aubergine diced and cubed (optional) can replace with green pepper 
2 tomatoes cut into quarters and diced
4 mushroom, quartered and diced (optional)
1/2 tsp paprika
2 tbsp Manchego cheese (optional)

In a frying pan on a medium heat, heat some olive oil and add your sliced cooking chorizo, cook for a couple of minutes to release the oils. Remove the chorizo with a slotted spoon to ensure the lovely oil remains in the pan and set aside.

Add your chopped onion and add to the frying pan and fry until its starts to soften slightly. Add the garlic, chopped peppers aubergine and fry until they start to soften (you may need to add more oil as aubergines are a hungry vegetable) if you don't want to use aubergine, then replace with some green peppers.

Add the mushrooms and the paprika and fry for a further minute, and now add the chorizo back to the pan.

In a jug, add the eggs, season and beat.

Add the beaten egg to the pan and keep stirring until the egg scrambles and is cooked through. Turn off the heat and add the Manchego cheese if using and serve :))

Aubergine isn't normally used but for a moorish version maybe add some cumin in as well! If you don't wang to use the aubergine, then replace with some green pepper :)

Tuesday 18 June 2013

Healthy Carrot Cake Flapjack Squares

As a kid i didn't really like cakes and the only thing in a bakery I would eat were flapjacks, they really were my favourite although it was always a treat to have one. I still like flapjacks now but gone were the days of enjoying the shop or bakery bought ones as I now prefer to make them myself and use lots of nuts and seeds and sometimes some citrus zest...ohh and now I'm feeling hungry! I don't really make them as often as I would like, purely for the fact of the high sugar and butter content so although they are packed full of oats, nuts and seeds I still always feel a tad guilty after I eat several slabs...oops, so following on from my healthy sweet recipes, I decided to try and make the good old fashioned flapjack healthy...not that easy hahaha! After much experimenting I've developed the closest I could without the use of sugar and large amounts of butter... This results in a moist flapjack and is a little more cakey but tasty never the less and ever so good for you :)) This healthy version would work well as a snack on the go, a late breakfast snack or something to eat after a workout...I'm happy with that :)!

Healthy Carrot Cake Flapjack Squares

180g (1 1/2 cups) rolled oats
100g (1/2 cup) banana
50g carrot grated
Handful of walnuts (broken into bits)
Handful of pumpkin seeds
25g butter
1/2 tsp cinnamon
1/2 tsp vanilla extract
1 tbsp honey
1 tbsp oil

Pre heat the oven to 150/140c fan

Add the oats, cinnamon, grated carrot, walnuts and seeds to a bowl

In a jug melt the butter in the microwave and add the mashed banana, honey, vanilla extract and oil and mix well

Add the banana mixture to the dry ingredients in the bowl and mix well

Spoon into lightly oiled or buttered 8" square cake tin (loose bottomed or springform would be best) and bake in the oven at 150/140c fan for around 35 minutes 

You can of course use a smaller tin (foil tin) and they will be deeper and more cake like which I have done before 

Sunday 16 June 2013

Fathers Day Treats..."Tidy Eton Mess"

Well it's Fathers Day today and of course me and my son had to go all out for the big day...so a couple of bottles of wine, a fab card, a karting voucher for him and some mates and a little something my son made him, he was over the moon, which I must say is a big improvement from what I had for Mother's Day...nothing :(! Not only that but I also made his favourite foods, a big chicken roast and Eton mess...well my version :))
I must say I'm not the biggest fan of meringue so I guess that means there's more for the hubby but I do like to make them as they are so simple to make and you can transform them into a wowtastic dessert. My version of Eton mess is "Tidy Eton Mess" I hate the thought of making these pretty meringues and then having to break them up to put into a dessert so I down right refuse and would rather make them pretty, so that's how my pretty Eton mess was created. I also like to make my cream filling a little more exciting, so I use a combination of cream and mascarpone, with a little icing sugar and vanilla extract, giving a lovely creamier taste and makes this dessert a little more interesting :)

So heres my recipe for the meringues and the filling...use these to create to wonderful "tidy Eton mess" tower :)

Meringue

3 egg whites
170g caster sugar

Put the egg whites into a bowl and with a hand mixer mix until you get stiff peaks

Slowly add in the cater sugar, about a tablespoon at a time until well incorporated

Spoon the meringue into a baking sheet and using a skewer swirl the meringue around and around until you get a good circle and a peak at the top

Pop into an oven at 140/130c fan for an hour (if one big one) or about 20 minutes if mini ones

Turn off the oven and leave to cool in the oven

Filling

125g mascarpone
200ml double cream
2 tbsp icing sugar (dependant on taste)
1 tsp vanilla extract

Place the double cream in a bowl and using a hand mixer beat until you get stuff peaks

In a separate bowl, add the mascarpone and mix to loosen slightly, add the icing sugar and vanilla extract and mix well

Add the mascarpone to the cream and fold in gently 

Tidy Eton Mess

Take one of the mini meringues and place on a plate, flatten slightly and spoon some of the cream mixture on top

Place some cut up strawberries on the cream and then a small amount of the cream (to hold the meringue in place) then top with another meringue. Flatten this one down slightly and repeat the process and top with the top meringue, I always use the nicest one for the top.

Another alternative is to use some lemon curd and blueberries, so after you have placed the cream on the first meringue, add a little lemon curd and top with some blueberries then a small amount of cream and repeat the process with another layer of meringue as above :)


Saturday 15 June 2013

Healthy Courgette, Banana, and Coconut Oat Loaf

I'm on a bit of a health kick at the moment, I've taken up swimming and I've been going 4 times a week and honestly at first I thought I would have to be dragged out the pool after about 2 lengths but I quite surprised myself and now after 4 weeks I'm on 64 lengths (1 mile)...with that and eating healthy even though I don't eat rubbish anyway, I thought it was about time to develop some sweet healthy recipes. I must say I'm always disappointed at results that come up when you search for healthy recipes as some of the ingredients are good foods, ie fruit or veg but then add in the large amount of sugar and it can't really be constituted as healthy, so I was on a mission! I had seen a recipe a while ago that sounded great so off to my kitchen I went to develop my own version and it was a huge success, tasty, healthy and without the guilt...no sugar! Hard to believe I know but honestly these mini loafs (or loaf) really do taste fantastic and you would never know that you didn't have the sugar piled into them! These are perfect for kids as well as loads of good foods packed into them and as long as you get gluten free oats, they are perfect for gluten free diet as well as there is no flour :)) 

Healthy Courgette, Banana and Coconut Oat Loaf

1/2 cup ground almonds
1/2 cup oats (not instant)
1/2 tsp baking soda
1/2 tsp ground cinnamon
2 eggs
1/2 tsp vanilla extract
2 tbsp rapeseed oil
1 tbsp honey
1 banana mashed (1/2 cup)
1/2 cup courgette grated
1/2 cup desiccated coconut
1/3-1/2 cup pistachio nuts (crushed)

Pre heat the oven to 180/170c fan

Add the ground almonds, oats, baking soda and cinnamon to a bowl and mix

In a jug add the eggs, vanilla extract, oil and honey and whisk until incorporated

Add the egg mixture to the dry ingredients and then add the mashed banana, the grated courgette, desiccated coconut and pistachios and mix well.

Pour into either a lightly oiled loaf tin or lightly oiled mini loaf tins (I used 4 mini ones)

Pop into the pre heated oven and bake for around 15-18 minutes, until golden in colour and a skewer comes out clean


Tuesday 11 June 2013

Butternut Squash and Coconut Pancakes

It's amazing how far one butternut squash can go and finally after four days I managed to use it all :) I did a wonderful butternut squash, feta, rocket and pine nut barley salad, pasta with butternut squash, pancetta, goats cheese and pine nuts and a butternut squash and goats cheese salad and finally today I knew I had to come up with something different...so while I was driving back from a play session with my son it came to me...Butternut Squash and Coconut Pancakes. Okay this may sound unusual but these are some of my favourite flavours and decided that why not combine them, the end result was wonderful. The taste is lovely and just the right amount of sweetness but perfect to go with a meat dish as well as some lovely goats cheese...honestly give them a try 

Butternut Squash and Coconut Pancakes

200g self-raising flour
1 tsp baking powder
Pinch of salt
3 heaped tbsp dessicated Coconut
1 egg
300ml Coconut Milk
170g butternut squash cut into small cubes and cooked in oil and ground cinnamon

In a bowl add the flour, baking powder, coconut and salt and mix

In a jug add the coconut milk and egg and whisk

Mash up the cooked butternut squash 

Pour the milk mixture in with the dry ingredients and then add the butternut squash and whisk until fully incorporated

Heat a little oil in a frying pan on a medium high heat

Pour out any excess oil and spoon some of the batter into your pan

Cook until golden underneath and turn over and cook on the other side

Once cooked remove from the pan and continue with the rest of the batter

I served mine with a goats cheese salad with some honey and maple BBQ pork steaks